Apple’s laptops pack gorgeous Retina displays, but even a 16-inch MacBook Pro screen starts to feel cramped once you’re juggling Slack, a dozen browser tabs, a spreadsheet, and a video call. The good news is that macOS has surprisingly flexible tools for adding real estate, whether you’re plugging in a cheap monitor or turning a spare iPad into a second screen with zero cables.
Extend vs. Mirror: The Setting Everyone Gets Wrong
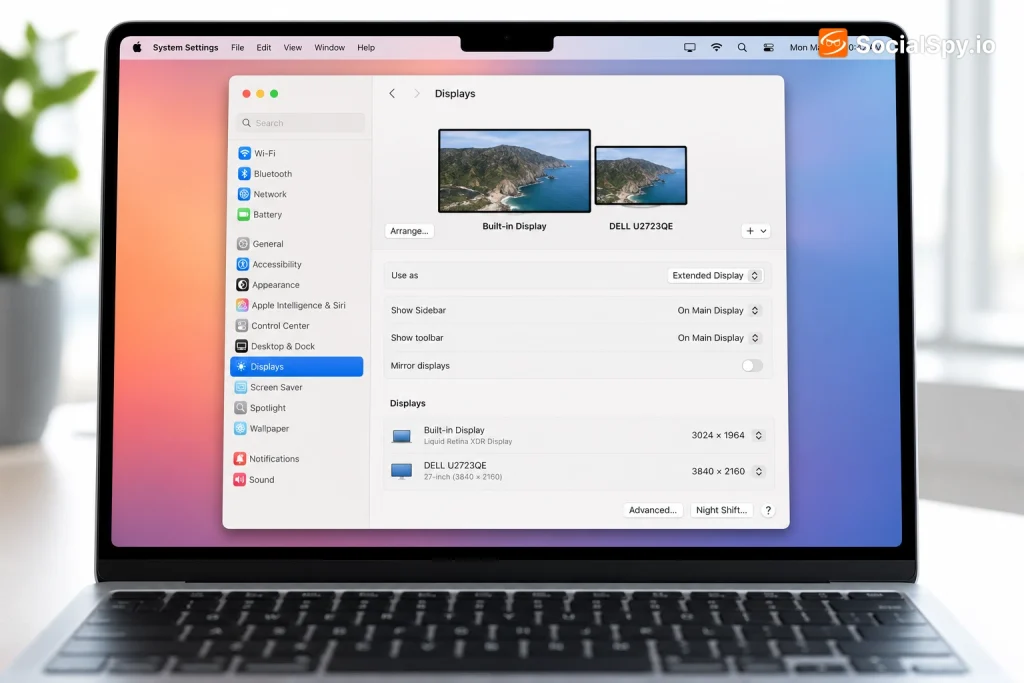
The single most common mistake people make when hooking up a second screen is not realizing macOS defaults to mirroring in some setups. Mirroring duplicates your MacBook’s screen onto the external display – same content, same resolution constraints, zero extra workspace. Extending, on the other hand, treats the second display as new desktop space where you can drag windows, open apps, and even run a full-screen app independently of what’s happening on your laptop screen.
Here’s the quick fix if you’re stuck in mirror mode:
- Open System Settings (formerly System Preferences on older macOS versions)
- Click Displays in the sidebar
- Select the external display’s icon at the top of the panel
- Uncheck Mirror Displays, then choose Extend Display from the “Use as” dropdown
- Drag the display’s rectangle in the arrangement diagram to match its physical position relative to your Mac
Apple’s own support documentation notes that most external monitors default to “Extend” automatically on first connection – but docking stations and older HDMI adapters sometimes force mirror mode until you manually override it.
Once extended, you can drag your cursor across the boundary between screens just like you would with two monitors on a Windows PC. The menu bar only appears on your designated “main” display, which you can reassign by dragging the little white bar icon in the Displays arrangement panel to whichever screen you check most often.
Setting Up a Wired External Monitor
Wired connections remain the most reliable way to extend your Mac’s screen because they avoid the latency and compression artifacts that sometimes plague wireless options. What you need depends heavily on which Mac you own.
Matching Your Cable to Your Mac
- MacBook Air/Pro (M1-M4, 2020-2026): Use the built-in Thunderbolt/USB-C ports directly, or with a USB-C to HDMI adapter for older monitors
- Mac mini and Mac Studio: Often include an HDMI port alongside Thunderbolt, so no adapter is needed for many TVs and budget monitors
- iMac (24-inch, M-series): Thunderbolt/USB-C only – factor in an adapter cost if your monitor is HDMI-only
- Older Intel Macs: May require a USB-C to DisplayPort adapter for 4K at 60Hz, since some cheap adapters cap out at 30Hz
Resolution matters more than people expect. A basic USB-C to HDMI adapter often maxes out at 4K/30Hz, which makes cursor movement and video look noticeably choppy. Spending an extra $15-20 on an adapter rated for HDMI 2.0 or higher gets you 4K/60Hz, which is the baseline for a smooth extended-desktop experience.
For anyone building a proper multi-monitor desk setup, a Thunderbolt 4 dock (from brands like CalDigit, Anker, or OWC) is worth the investment. These docks let you drive one or two high-resolution external displays, charge your laptop, and connect peripherals through a single cable – genuinely useful if you move your Mac between a desk and a couch regularly.
Apple Silicon’s Display Limits (and the Workarounds)
This is where things get genuinely confusing, because Apple’s chips don’t all support the same number of external displays. It’s tied to the chip’s internal display engine, not a software restriction Apple could easily lift.
| Chip | External Displays Supported | Notes |
|---|---|---|
| M1 (base) | 1 external | Lid must stay open |
| M1 Pro/Max/Ultra | 2-4 external | Varies by Mac model |
| M2/M3 (base) | 1 external | Same limitation as M1 |
| M3 Pro/Max | 2-4 external | Matches Pro/Max tier |
| M4 (base, 2024+) | 2 external | Apple added dual-display support via software update |
The M4 base chip is a notable exception – Apple quietly enabled two-external-display support on base M4 MacBook Pros starting with macOS Sequoia, something that never happened for base M1, M2, or M3 chips. If you’re shopping for a new Mac specifically to run an extended multi-monitor setup, that’s a real reason to wait for M4 or later rather than grabbing a discounted M2 model.
For anyone stuck with a base M1 or M2 chip who needs more than one external display, DisplayLink adapters (using software-based rendering rather than the chip’s native display engine) are the standard workaround. They’re not perfect – expect slightly higher CPU usage and occasional lag during video playback – but they genuinely add a second or third display where Apple’s hardware says no.
Going Wireless: Sidecar, AirPlay, and Universal Control
Not every extended display needs a cable. macOS has three distinct wireless features that often get confused with each other, so it’s worth knowing exactly what each one does.
Sidecar: Turn Your iPad Into a Second Screen
Sidecar, introduced back in macOS Catalina, lets you use a compatible iPad as a genuine second display for your Mac – either wirelessly over Wi-Fi/Bluetooth or via a Lightning/USB-C cable for zero-latency performance. It supports Apple Pencil input too, which makes it a favorite among designers who want a drawing tablet and a second monitor in one device.
- Works with iPad models released in the last several years running a compatible iPadOS version
- Both devices need to be signed into the same Apple ID with Wi-Fi and Bluetooth enabled
- Enable it via Control Center on the Mac, or System Settings > Displays
AirPlay: Any Apple TV or Compatible Smart TV
Since macOS Monterey, you can extend your Mac’s display to an Apple TV or an AirPlay 2-compatible smart TV, no cables required. It’s convenient for a quick presentation or casting a document to a living room TV, though it introduces more lag than a wired setup, so it’s not ideal for fast-motion video editing or gaming.
Universal Control: Not the Same as Extending
Universal Control is often mistaken for a display-extension feature, but it actually does something different – it lets you move a single mouse cursor and keyboard seamlessly across multiple Macs and iPads sitting near each other. Each device still runs its own separate interface; you’re not extending one desktop across two screens, you’re just controlling multiple devices without switching input hardware. It’s genuinely useful if you keep an iPad propped up next to your MacBook for reference material, but don’t expect it to behave like Sidecar.
Troubleshooting Common Extended-Display Problems
Even with the right cable and settings, extended displays misbehave in predictable ways. Most issues fall into a handful of categories.
- Display not detected: Try a different port, reseat the cable fully, and check that the monitor is set to the correct HDMI/USB-C input
- Resolution looks blurry or oversized: Go to Displays settings, click “Advanced” or hold Option while clicking “Scaled,” and manually select a resolution that matches your monitor’s native spec
- External display shows a black screen after waking from sleep: Unplug and replug the cable, or toggle Bluetooth off/on if using a wireless keyboard/mouse that’s interfering with wake signals
- Menu bar appears on the wrong screen: Drag the white menu bar icon in the Displays arrangement panel to the display you want as primary
- Refresh rate stuck at 30Hz on 4K monitors: Usually an adapter/cable limitation – upgrade to an HDMI 2.0-rated cable or a native DisplayPort connection
If none of that works, resetting the Mac’s display preferences by holding Command + Option + P + R at startup (on Intel Macs) or simply removing and re-adding the display profile in Displays settings on Apple Silicon Macs often clears up persistent detection issues.
Getting the Most Out of Your Extended Workspace
Extending your screen is only half the battle – arranging it well is what actually makes you more productive. A second monitor placed at the wrong height or with mismatched scaling can cause more eye strain than working on a single laptop screen.
A few habits worth adopting:
- Match brightness and color temperature between screens – Night Shift settings sync automatically, but manual brightness often doesn’t
- Use Stage Manager or Mission Control spaces to keep reference windows on the external display while your main workspace stays on the laptop
- Position the monitor at eye level, roughly an arm’s length away, to reduce neck strain during long sessions
- Assign different desktops (Spaces) to each display if you use Mission Control heavily, since it lets you swipe between task-specific layouts without cluttering one screen
- Keep your external display clean and glare-free – if you’ve added a protective film or matte screen protector to reduce reflections, and you’re dealing with trapped air pockets, the same fixes covered in how to get rid of screen protector bubbles apply to monitor films just as well as phone screens.
It’s also worth thinking about screen size proportionally. If you’re comparing display real estate across your whole Apple ecosystem – deciding whether an iPad, an iPhone, or an external monitor gives you the most usable space for a given task – it helps to know exactly how current models stack up, which is covered in more detail in which iPhone has the largest screen if you’re weighing a phone-based extended display against a proper monitor.
Conclusion
Extending your Mac’s screen isn’t a single feature – it’s a toolkit, and the right approach depends entirely on your hardware and how you work. A base M1 or M2 MacBook with a single Thunderbolt monitor is a completely different setup than an M4 Pro Mac Studio driving three 4K displays through a dock, and both are valid depending on your budget and workflow. The real unlock most people miss isn’t buying a bigger monitor – it’s realizing Sidecar can turn an iPad already sitting on their desk into a second screen for free, or that AirPlay can push a quick presentation to the living room TV without a single cable. Start with what you already own before spending on new hardware, then upgrade cables and adapters only once you’ve confirmed your Mac’s chip can actually support the display count you’re aiming for.
FAQ
Yes – if you own a compatible iPad, Sidecar lets you use it as a wireless or wired second display for free, and AirPlay lets you extend to an Apple TV or AirPlay-compatible smart TV without any additional hardware purchase.
It comes down to the chip’s built-in display engine rather than a software restriction – base-tier M1, M2, and M3 chips physically support only one external display, while Pro, Max, and Ultra variants support two to four. Apple’s base M4 chip is the exception, adding dual-external-display support starting with macOS Sequoia.
Open System Settings > Displays, select the external monitor, hold the Option key and click “Scaled” to reveal all supported resolutions, and choose the one matching your monitor’s native resolution rather than relying on macOS’s automatic “Default” scaling choice.