YouTube uploads look deceptively simple until you’re staring at a progress bar wondering why your video is stuck processing, or why your carefully written title got flagged for a Community Guidelines review. Whether you’re posting your first video or your five-hundredth, the platform’s upload flow has more moving parts than most creators realize. This guide walks through the actual mechanics, the settings that matter, and the mistakes that quietly tank performance before a single viewer clicks play.
Before You Upload: What Actually Matters
Most upload mistakes happen before the file even reaches YouTube’s servers. Getting the technical basics right saves you from re-uploads, which reset your view count and any early momentum the algorithm might’ve given you.
YouTube’s recommended specs aren’t arbitrary — they map directly to how the platform’s compression and playback systems work best.
- Resolution: 1080p minimum in 2026, with 4K increasingly standard for tech, gaming, and travel content
- Aspect ratio: 16:9 for standard videos, 9:16 for Shorts (anything under 3 minutes and vertical gets auto-classified as a Short)
- File format: MP4 with H.264 codec remains the safest bet for fast processing
- Frame rate: 24, 30, or 60fps — match your source footage, don’t convert
- Max file size: 256GB or 12 hours, whichever comes first, though most creators never approach that limit
One detail creators miss: YouTube re-encodes every upload regardless of quality, so uploading in the highest bitrate your camera or editing software supports gives the algorithm better raw material to compress. A blurry upload stays blurry no matter how good your internet connection is.
Industry analysts tracking creator workflows note that channels using consistent 1080p-or-higher uploads see measurably better retention graphs than those mixing resolutions across a channel — YouTube’s recommendation system appears to weight perceived quality signals even when viewers can’t consciously articulate why one video “feels” better.
The Upload Process, Step by Step
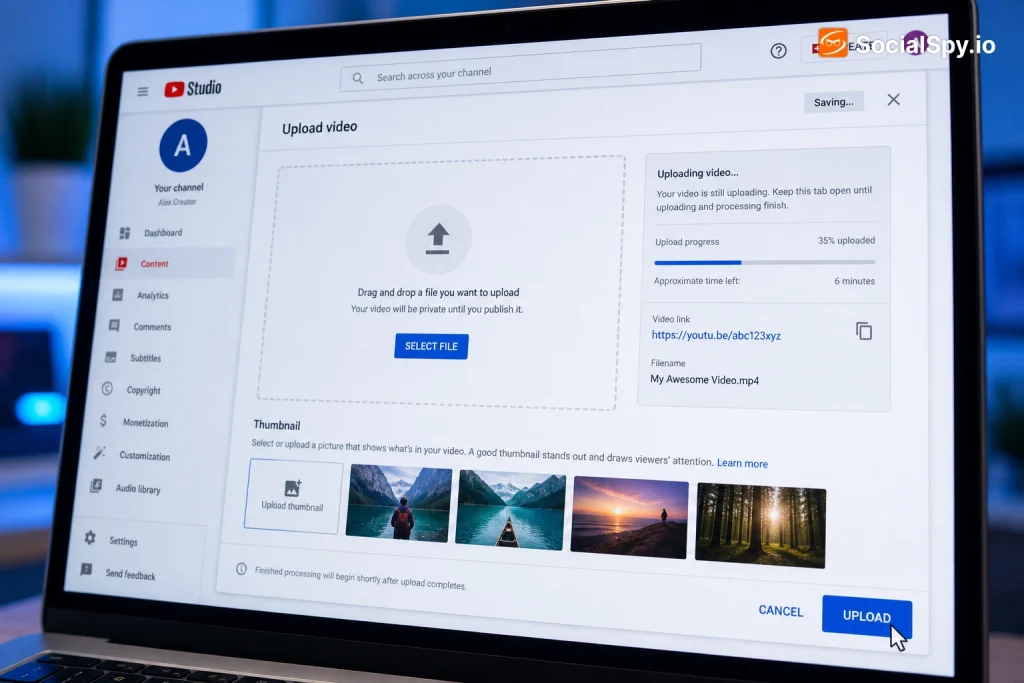
The actual upload button is easy to find, but the six-screen flow that follows determines whether your video performs. Here’s the sequence on both desktop and mobile.
- Start the upload — On desktop, click the camera icon with a “+” in the top right of YouTube, then “Upload video.” On mobile, tap the “+” icon at the bottom of the app and select “Upload a video.”
- Select your file — Drag and drop or browse; larger files can take anywhere from a few minutes to over an hour depending on length and your upload speed.
- Add details — Title, description, thumbnail, playlist placement, and audience designation (made for kids or not).
- Set video elements — This is where you add end screens, cards, and subtitles/closed captions.
- Check visibility — Choose Public, Unlisted, Private, or Scheduled.
- Publish or schedule — Confirm and either go live immediately or set a future date and time.
The processing bar you see is doing two things simultaneously: uploading the raw file and generating multiple resolution versions (YouTube typically creates renditions from 144p up through your source quality). HD processing sometimes lags behind the initial “your video is live” notification, which is why a video can look blurry for the first 20-30 minutes after publishing even though the upload itself finished.
Mobile vs. Desktop Differences
Desktop uploads give you access to the full YouTube Studio editing suite during the upload flow, while the mobile app streamlines things for speed. If you’re doing anything beyond a quick post, desktop is worth the extra step.
- Desktop advantages: Full metadata editor, easier drag-and-drop for thumbnails, better preview of how titles/descriptions render
- Mobile advantages: Faster for spontaneous uploads, built-in trimming and filters, direct access to Shorts creation tools
- Shared limitation: Neither interface lets you fully customize monetization settings until the video has finished initial processing
Titles, Descriptions, and Tags That Actually Get Found
Metadata is where most beginners either overthink or completely ignore the work, and both extremes cost views. YouTube’s search and recommendation systems parse your title, description, and tags as text signals, but they also cross-reference actual video content through closed captions and, increasingly, visual recognition.
A good title balances two competing goals: it needs to satisfy search intent (so it shows up when someone types a query) and it needs to prompt a click in a crowded feed. Front-loading your primary keyword in the first 60 characters helps both goals since that’s the portion visible on mobile search results.
Description best practices worth following:
- Write the first two lines (roughly 100 characters) as if they’re a headline — this is what shows before “Show more”
- Include your primary keyword naturally within the first paragraph
- Add timestamps for videos over 5 minutes; YouTube auto-generates chapter markers from these
- Link to related content, playlists, or your other channels where relevant
- Avoid keyword-stuffing tags — YouTube’s algorithm has gotten much better at penalizing this since around 2023, and tags now carry less weight than titles, descriptions, and actual watch behavior
| Metadata Element | Character Limit | Primary Purpose |
|---|---|---|
| Title | 100 characters | Search + click-through |
| Description | 5,000 characters | Search context + engagement |
| Tags | 500 characters total | Minor search assist, misspelling coverage |
Thumbnails deserve as much attention as titles, arguably more. A 1280×1080 custom thumbnail with high contrast, minimal text (under 4-5 words), and a clear focal point consistently outperforms auto-generated frame grabs. YouTube lets you upload custom thumbnails once your account is verified via phone number, which takes about two minutes if you haven’t already done it.
Visibility, Scheduling, and Audience Settings
The visibility dropdown looks simple but has real consequences that trip up new uploaders constantly. Choosing wrong here can mean your video never gets discovered, or worse, gets restricted before anyone sees it.
- Public: Immediately visible to everyone, appears in search and recommendations
- Unlisted: Only accessible via direct link, useful for client previews or embedding on external sites
- Private: Visible only to accounts you specifically invite, capped at 50 people
- Scheduled: Set a future publish date/time; the video stays unlisted until then, and you can share the pre-launch link to build anticipation
Scheduling is underused by smaller creators but it’s one of the simplest performance levers available. Publishing consistently at the same time each week trains both your subscriber base and YouTube’s recommendation algorithm to expect content on a rhythm, which studio analytics dashboards reward with more stable impression counts over time.
The “Made for Kids” designation is mandatory, not optional, and misclassifying it carries real risk. Since the FTC’s 2019 settlement with YouTube over COPPA violations, the platform actively enforces this — videos marked for kids lose access to comments, personalized ads, notification bells, and several other engagement features. If your content isn’t specifically aimed at children, mark it “Not made for kids,” but be honest about it since misclassification can trigger channel-level penalties.
Age Restrictions and Content Warnings
Beyond the kids designation, you’ll also flag whether content contains material inappropriate for viewers under 18. This affects monetization eligibility and where the video can be embedded or promoted.
Optimizing After You Hit Publish
Publishing isn’t the finish line — the first 48 hours after a video goes live disproportionately shape how far YouTube’s recommendation engine pushes it. This is the window where click-through rate and average view duration get measured against your channel’s baseline.
Post-publish actions that move the needle:
- Pin a comment with a question or call-to-action within the first hour to seed engagement
- Share to Community tab if you have one unlocked (requires 500+ subscribers as of current thresholds)
- Cross-post the link to owned channels — email lists, Discord, or other social platforms
- Monitor Audience Retention graphs in YouTube Studio within the first few hours; steep early drop-offs signal a thumbnail/title mismatch with actual content
- Add end screens and cards if you didn’t during upload — these can be edited post-publish without resetting any performance data
One thing many creators don’t realize: editing your title or thumbnail after publishing does not reset the video’s standing in the algorithm the way it used to years ago, but drastic changes (swapping topics entirely) can confuse the recommendation system and temporarily suppress impressions. Minor tweaks for clarity are generally safe.
If you’re running a channel that mixes YouTube with other platforms, it’s worth stepping back and considering how the platform actually functions in your broader strategy — the debate over whether YouTube counts as social media matters practically because it changes how you think about posting cadence, community features, and cross-promotion versus treating it as a pure video hosting service.
Common Upload Problems and How to Fix Them
Even experienced creators hit snags. Knowing which issues are normal processing delays versus actual problems saves a lot of unnecessary troubleshooting.
- “Video is still processing” for hours: Usually resolution/length related; 4K and 60fps files take significantly longer than 1080p30
- Copyright claim immediately after upload: Content ID scans happen automatically; check the “Copyright” tab in Studio to see the specific match and dispute if it’s a false positive
- Upload fails repeatedly: Often a codec issue — re-export as standard MP4/H.264 rather than more exotic formats like ProRes or HEVC
- Thumbnail won’t upload: Must be under 2MB and in JPG, GIF, BMP, or PNG format
- Video stuck in “unlisted” despite selecting public: Check if age restriction or Content ID claims are auto-limiting visibility
Content ID is worth understanding in more depth since it catches out even careful creators. YouTube’s system scans audio and video against a massive database of copyrighted material the moment your upload finishes, often before processing even completes.
A claim doesn’t necessarily mean your video gets removed — most result in the copyright holder simply monetizing your video instead, or restricting it geographically. You can dispute claims you believe are invalid, though disputes take up to 30 days to resolve and repeated disputes without merit can affect channel standing.
Conclusion
The mechanics of uploading a video to YouTube take five minutes to learn and years to master, because the button-click part is trivial while the metadata, timing, and post-publish optimization stack up into a genuine skill. Creators who treat every upload as a full production — proper resolution, a deliberate thumbnail, a front-loaded title, a scheduled release time, and active engagement in the first hours — consistently outperform those who just drag a file in and walk away. The platform has also gotten smarter about parsing actual video content rather than just text metadata, which is part of a broader shift where AI-driven systems increasingly analyze what’s happening on screen rather than relying purely on what creators type; the growing conversation around whether tools like ChatGPT can watch videos reflects how quickly video-understanding AI is advancing across the whole industry, YouTube included. None of that changes the fundamentals covered here, but it’s worth knowing that the gap between “technically uploaded” and “actually optimized” is where most of the real growth on this platform happens.
FAQ
Processing time depends heavily on resolution, length, and file size — a standard 10-minute 1080p video typically finishes within 15-30 minutes, while 4K or longer videos can take several hours. The video may show as “live” before HD quality is fully available, so don’t panic if it looks blurry immediately after publishing.
Yes, all of these can be changed anytime through YouTube Studio without needing to re-upload the file or reset the video’s view count. Minor edits for clarity generally don’t hurt performance, but completely changing the topic or thumbnail style shortly after a strong launch can confuse the recommendation algorithm.
This is almost always triggered by YouTube’s automated Content ID system detecting copyrighted audio or video, or by content flags related to sensitive topics, sponsored content disclosures, or the “Made for Kids” setting. Check the Copyright and Restrictions tabs in YouTube Studio for the specific reason, and use the dispute process if you believe the claim or restriction was applied incorrectly.